Citroen Relay
Phoebe On The Road Begins......... Now!
Planning EVERYTHING down to the position of the piping for the electrics, water, USB sockets and bed placement is tiring. I have measured out (mentally) the plan for inside the van, everything manages to fit. The bed takes up just under half of the van.

The main things that were important to me to have in the van;
-
A seating area that converted into a bed
-
the bed to be at the back of the van with no obstruction for getting out the back of the van
-
Being able to get into the cab of the van without actually getting out
-
A storage area to be able to hang clothes
-
Storage on the sides of the van at headheight
DVLA must haves to be able to convert it on V5;
-
A door that provides access to living area
-
a bed that has a minimum length of 1800mm and must be permanently fixed to the body of the vehicle
-
A water storage container
-
a seating or dining area that is permanently attached to the vehicle, table can be removed but must not be loose
-
a permanently fixed means of storage
-
a permanently fixed cooking facility powered by gas or electricity
-
at least one window on the side of the accommodation

Having looked into various other vans, what other people have used to convert their van and the space in the 'loading' area, I decided on these;
-
Fiat Ducato
-
Mercedes Sprinter
-
Peugeot Boxer
-
Luton van
-
Ford Transit
-
Renault Master
-
Citroen Relay
There are various issues with each one, I took into consideration the MPG, rust, cost of parts to replace, if the parts are available in Europe, how often the main parts of the engine would need changing. I decided on a Citroen Relay L3 H2 2.0.
I looked into buying a second hand van for months and months, checking various selling sites, looking at what was in auction sites etc. I found that they all had 170k+ miles on them, were not running, rusty all over, corroded underneath. Although all of these things could be fixed I did not want to spend my time and in a garage having repairs done or constantly breaking down ( I know that even brand new vans break down too). After looking at 100's and 100's of vans online and keeping up to date with it all nothing ticked all of my boxes; little to no rust, chassis in great condition, less than 150k miles. I didn't even mind having to travel for the van if it was the right one.
I looked at a few vans but again there were always issues that I didn't want to waste time or money on repairing!
I was going into town on a Friday after I had finished work to go and get a party outfit, but I couldn't fin anything I liked. I just gave up and started driving back to my mums. On the way back I drove past a garage (bristol street motors) I thought I may as well go in and ask what they have, if they had anything I could look at on the forecourt. There were no vans to view, but I inquired. Roll on the 20th May (my birthday) and at 11am I was driving away with my Citroen Relay L3H2!?
I had spoken to family about this and a friend just to make sure I was doing the right thing, but I knew I was. I was so excited about driving my beautiful new van; Susan, home from the dealership.
My mum and I had already measured the van on the drive just to make sure it would fit! It does, so Worcester now have a van to look at for the next few months while I pick it to shreads and make it my home.
On the Monday, I drove Susan to a few hardware stores so i could get some supplies to start fitting her out.


After I had dropped my van off where I would be converting her for the foreseeable future. I decided to go and grab some materials so I could get started on the flooring. Windows and electrics to be fitted in June.


On the flooring of the van there were areas that the floor was raised, I didn't want to fit batons onto the flooring to try and get as much space as possible for the storage areas later on.
I cut strips of celotax on to the flooring, used spray adhesive to stick it down (double layers). This was super easy to do, although you do get covered in glue and it's crazy difficult to get off. I lay the kinspan flooring down, measured and cut to get a good tight fit, or so I thought... I just used spray foam to fill in any gaps later on.


Bought the Kingspan and Plywood (9mm) from Wickes, celotax and spray adhesive from Homebase, spray foam and various other things from B&Q.
The English weather held out for two days for me to get all of this done! Next mission is to lay the flooring, fit the edging to give it a nice finish, fit the windows and have the electrics done!
Windows
After being quoted ridiculous prices to have the windows fitted, I decided against going with a company to fit the windows. So instead, I bought the windows from Leisure Vehicle Windows (100% recommend), and roped my step dad and friend into helping me fit them!


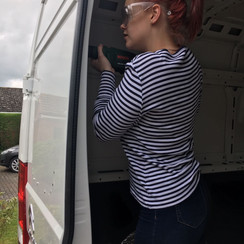


Having primed etc the back two windows and glued them on, I needed to make sure that they were as secure they were going to be, DUCT TAPE!! I could have easily gotten away with not using the tape as the windows stuck like crazy! Instructions were easy to follow and although I read them 20 million times I could have gotten it with the first instruction. I had already laid everything out, so definitely overkill!
To drill the shape of the window space, I drilled from the inside of the van out following the shape of the metal work. Playing dot to dot using the jigsaw to cut out the shape was easy! On the first window I didn't use masking tape to protect the edge of the van, on the next two windows I put masking tape all the way around as to not scratch the van, it looks super neat!
Primed and used the primary adhesive to prepare the van and the windows, the black glue that came with the windows was super thick and a little difficult to get out of the tube (definitely rope in a strong individual to help).


All Videos
Vinyl Flooring
Being mindful of the weight limit in my van I wanted to save this by using vinyl! It was easy to cut, easy to lay and it looks great! I bought the flooring from CarpetRight. I knew the exact flooring I was looking for, it is easy to wipe clean, it wont go funny if any water gets onto the flooring and its easy to change if I decide later on that I don't like it.
As the vinyl was quite stiff I laid it out in the sun for 10 minutes to soften up a little before it went into the van. I rolled it length ways in the van starting on the drivers side.


The flooring was so so so easy to fit! The lines are straight and it was easy to cut into shape around the curves and bends of the van. I used white silicone to give it a neat finish, clean and also hide any parts that I didn't cut very well (oops).
It looks lovely down, gives it a really nice finish.
To stick the vinyl down I used carpet adhesive from Homebase, half a can covered the floor more than enough! It stuck within a few minutes, pulled it tight so no ruffling anywhere when the rest of the build continues.
Ceiling / Vent


Fitting the vent was the same as fitting the windows. Using a jigsaw to cut the pattern out, using paint to protect the exposed paint, fitted the trim to make the gap slightly tighter, put the vent into the gap and used 'sticks like sh*t'. Attached the bottom and used silicone to seal.
Hey presto! Working and waterproof vent!

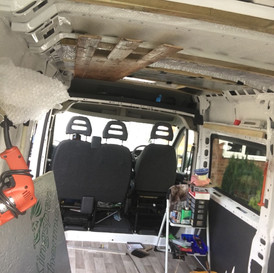
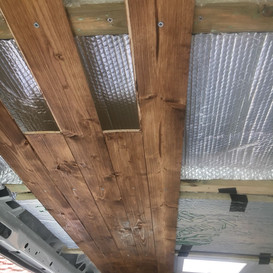
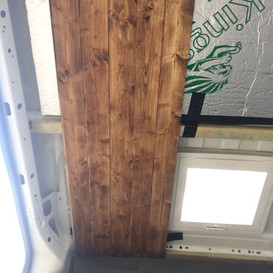
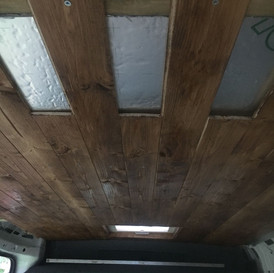
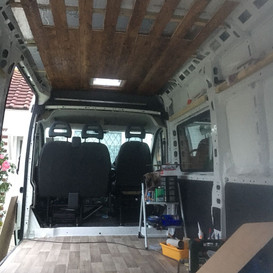
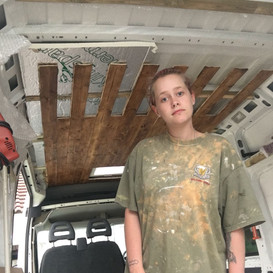
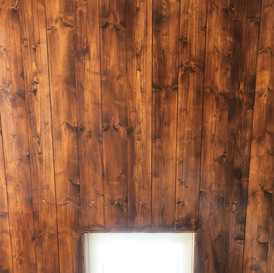
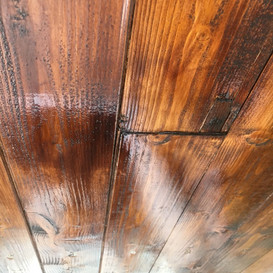
Cladding the ceiling was super easy! Even on my own, along the support beams of the van, i pre-drilled holes and used self tappers with the batons, even though there is not that much weight on them, I reallllly did not want anything to fall down! I cut the batons into three to relieve some of the pressure on them before attaching the cladding.
I stained the cladding before putting it on the roof as I thought it would be easier (no!) after attaching them onto the roof I had to restain them because there were loads of little white gaps - annoying. I then had to do this again later on in the build.
Building Units
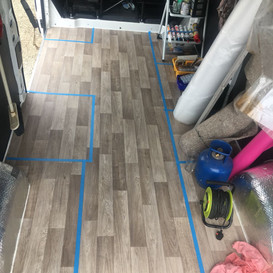


Beginning the units I knew the layout I wanted and where I wanted the bed, cooker, large storage unit and overhead cabinets to go, but I was not sure of the sizes or how much space the bed/seating area would take up. Using the blue tape I had I lay out the flooring plan I wanted.
I used 2x2 wood for the majority of the frames as a lot of the frames will be holding quite a lot of weight. I used 2 1/2" screws to hold the frame work together, and 'L' shaped brackets to in some areas (I am terrible at using a set square, cutting straight edges and drilling holes). I did use a drill to initially drill the holes then put the screws in.


My little helper - LouLou. She was chasing off anybody who pulled into the cul-de-sac, barking at people and eating ants. She was very helpful!
Lou is a 4 year old little Tibetan Spaniel.
She's cute, noisy, very friendly and loves cuddles.


Building the units was probably one of the hardest things I have done so far in this build... I am terrible at cutting straight lines, I am terrible at numbers and regularly flick between inches and centimeters, using a set square seemed to prove really difficult!
In one day I went to the shop 3 times! MAKE LISTS BEFORE YOU LEAVE PEOPLE.
I made the seating area at the height of my knee caps as I didn't want to be up too high so I couldn't sit comfortably or too low so that it felt I was sat on the floor.
The tall unit at the moment is a wardrobe but maybe later on it could be changed to a shower cubicle.
Ply lining & Painting


Ply lining the walls was actually much easier than I thought it would be. I used 5.5mm plywood to ply line all the walls, cupboards, units and overhead cabinet doors.
For the work surface I used a conti board type material from Homebase, it cleans nicely and doesn't expand when it gets wet. I have just finished off the edges with an aluminium trim.


I added a large cupboard door onto the wardrobe unit, I decided to build one large door instead of building two smaller doors purely for aesthetics and I am terrible at cutting lines...
I decided to paint everything white because I wanted the space to feel open and let as much light in as possible. As it is going to be my home I didn't want to feel as claustrophobic or like I had no where to go. I used wood primer - to stop the ply soaking up the gloss paint. Then the white gloss paint - easily cleaned and shiny!
I filled any gaps in with silicone...
.jpeg)
Mattress in! Some how (without measuring) I managed to make it exactly a double bed! I had to cut the corners off at the back of the mattress to make it fit snug in place.
Solar Panels & Electrics
Fitting the electrics and the solar panel was actually much easier than I thought. I bought the kit and everything; inverter, wiring, junction boxes, solar panel (100w), charge controller, silicone, brackets and LCD screen. I bought the kit from bimble solar, I spoke to the advisors over the phone and they helped me set up a basket as to what I needed - helped me decide what size solar panels I would need for my needs; charging my phone, powering my laptop, charging my cameras... I only have a 375w inverter as that's all I needed.. Anything bigger and it would have been pointless because I don't power anything that high..


.jpeg)

.jpeg)

Kitchen Units
Originally I wanted to put a curtain across the kitchen area to make it feel warmer and cosy, I didn't want to have cupboards. After going away for the weekend I realised that wood fronts would be easier, and it would stop everything falling out when I went around corners... Apologies to anyone in Devon that weekend when I drove around roundabouts at 10mph to stop everything decorating my floors!
For the bottom doors I used 9mm ply as I wanted these to be a little sturdier than the top cupboards with everything bumping them. With the top set of doors I just put the hinges straight onto the framework I had built on the inside, but for the bottom ones because I wanted them to sit closer together and without seeing a cm of inside the cupboard... I chiseled out the section where the hinge was going, this brought the cupboard tighter into the unit framework and gave it a neater finish. Much happier with the result of these than the top ones.


Paint cleaned off of the floor.... Looking all tidy, clean and like my home again.
I have put all the handles on too, so I can get into the cupboards, put a lock on a couple of the doors so that when I am driving nothing falls out and push them open.
Wood Burner
I had no idea where to begin with what to use for heating the van. I decided I did not want to have a diesel heater in here just because I had heard they can be noisy, I did not want to have something that used electricity (just because I am new to this, I am figuring out what I do and do not want or can't use).
I loved the potbelly small log burner, I only needed 0.7kW heater for the van as it's only a small, but I went for a 6.7kW. This was just because I decided that if I did not need the heat then I could only put a few logs in, whereas if I needed extra heat then I can top it up with more logs.


Before the silicone can go on, the cement needs to dry and harden (PLEASE NO RAIN).
.jpeg)


